Setup Guide
This article details everything you should need to get started using PCSX2.
If this article does not help solve your problem, reach out in the Discord or the forums for help.
Requirements to use Nightly PCSX2 builds
System Requirements
Minimum
- Operating system
- Windows 10 21H2 (1809 or later) (64-bit)
- Ubuntu 20.04/Debian or newer, Arch Linux, or other distro (64-bit)
- CPU
- Supports SSE4.1
- PassMark single thread performance rating near or greater than 1800
- Note: Recommended single thread performance is based on moderately complex games. Games that pushed the PS2 hardware to its limits will struggle on CPUs at this level. Some release titles and 2D games which underutilized the PS2 hardware may run on CPUs rated as low as 1200.
- Two physical cores, with hyperthreading
- GPU
- Direct3D10 support
- OpenGL 3.x support
- Vulkan 1.1 support
- PassMark G3D Mark rating around 3000 (Geforce GTX 750, Radeon RX 560, Intel Arc A380)
- Note: Recommended GPU is based on 3x internal, ~1080p resolution requirements. Higher resolutions will require stronger cards; 6x internal, ~4K resolution will require a PassMark G3D Mark rating around 12000 (GeForce GTX 1070 Ti).
- Just like CPU requirements, this is also highly game dependent. A quick reference for GPU intensive games: Wiki
- Note: Recommended GPU is based on 3x internal, ~1080p resolution requirements. Higher resolutions will require stronger cards; 6x internal, ~4K resolution will require a PassMark G3D Mark rating around 12000 (GeForce GTX 1070 Ti).
- 2 GB video memory
- RAM
- 4 GB system memory
Recommended
- Operating system
- Windows 10 21H2 (1809 or later) (64-bit)
- Ubuntu 22.04/Debian or newer, Arch Linux, or other distro (64-bit)
- CPU
- Supports AVX2
- PassMark single thread performance rating near or greater than 2600
- Four physical cores, with or without hyperthreading
- GPU
- Direct3D12 support
- OpenGL 4.6 support
- Vulkan 1.3 support
- Metal support
- PassMark G3D Mark rating around 6000 (GeForce GTX 1650, Radeon RX 570)
- 4 GB video memory
- RAM
- 8 GB system memory
Required software
- You need the Visual C++ 2019 x86 Redistributables to run PCSX2. They are combined with other yearly releases Visual Studio 2015, 2017, 2019, and 2022. 64-bit version (x64) is required for 1.7.0 and higher (though early 1.7 builds still required 32 bit versions)
Version deprecation notes
- Windows XP and Direct3D9 support was dropped after stable release 1.4.0.
- Windows 7, Windows 8.0, and Windows 8.1 support was dropped after stable release 1.6.0.
- 32-bit support was dropped after stable release 1.6.0.
Downloading and configuring PCSX2
- Download the version suited for you from our Downloads Section (for beginners, the full installer of the latest stable release is recommended) unless otherwise stated like the nightly.
- Get the BIOS file from your PlayStation 2 console. This is not included with PCSX2 since it breaks copyright law, so you have to obtain it from your console. See below for how to do this.
- Configure the emulator using the provided instructions in the stable release download. Alternatively these can be found here in the GitHub repository
- Translated versions of this guide are available, but your milage may vary as many are not for the latest stable version. See below for links to these
- Launch your game using the ISO file that you have dumped yourself. See below for how to do this
Translation
From nightly 1.7.XXXX, we have transitioned to cloud translations with crowdin instead of local files via poedit in the past.
https://crowdin.com/project/pcsx2-emulator
Still have problems?
If your game is not working, there are a few things you can do:
- Check the compatibility page to see if the game has been tested to run properly
- Consult the wiki page for the game for similar information
- Check the GitHub issues page to see if there are any reported issues
It works but it's slow?
This is the most common problem users experience. PCSX2 is a very hardware intensive program, especially on your processor.
It is highly recommended you read the first post of this thread: Will PCSX2 run fast on my computer? and if you still have questions reply to the thread or in the Discord, there are many helpful members who will answer.
Reach out for help
If none of the above suggestions help you solve your problem, consider reaching out in either the Discord or the forum.
How to dump your PS2 BIOS
In order for PCSX2 to function properly, both a legitimate BIOS and copies of games must be obtained from your own PlayStation 2 console and original PlayStation 2 discs respectively. The following explains the recommended ways to accomplish both of these tasks.
Dumping your PS2 BIOS is conceptually a two-step process:
- Modify the operation of your PS2 so that it can run any program.
- Then you can run a "BIOS dumper" utility program on your PS2 that reads its BIOS and writes it to a USB drive.
There is a generally useful program, uLaunchELF, that lets you browse memory cards, DVDs, and USB drives connected to a PS2 and run programs from them. So for most of the approaches below, you use uLaunchELF to then run the BIOS dumper.
Popular approaches to modify PS2 operation
- FreeMcBoot Memory Card
- Works for all but the newest (9xxxx serial number with a date code larger than 8B) slim PS2s. Can be found online for ~10 USD.
- FreeDVDBoot
- Works for many slim models, and some phat models. Slight effort, but free.
- You will require a blank DVD for this method to work!
- Disc swap exploits
- Technical in nature, involves hardware tampering. Guides can be found quickly by Googling.
- Mod chips
- Extremely technical, requires soldering skills. DO NOT ATTEMPT unless you are an electronics pro.
Downloading the BIOS dumper utility
Our recommended BIOS dumper utility is biosdrain. Therefore the instructions below will be for this tool.
- The download for the latest stable biosdrain is here.
Option 1: Starting a PS2 with FreeMcBoot
- Plug the FreeMcBoot memory card into memory card port 1
- Turn on your PS2 with no disc inside.
- Select uLaunchELF from the menu.
Option 2: Starting a PS2 with FreeDVDBoot
- Download the ISO which matches your console from https://github.com/CTurt/FreeDVDBoot/tree/master/PREBUILT%20ISOs
- Burn the ISO to a DVD.
- The most generally reliable media is a DVD-R disc, burned at a slow speed (4X speed should be fine).
- Insert the burned FreeDVDBoot disc, then reset/turn on your PS2. uLaunchELF should open.
Dumping the BIOS
There are two options available when dumping the BIOS. biosdrain supports USB and HOST through PS2link. If your console does not have networking support, please refer to the USB method, otherwise you can use the ps2client method.
USB
Take the biosdrain.elf file that was downloaded above, and transfer it to a FAT32 formatted USB flash drive.
- Please note that some incompatibilities between certain USB drives and PS2 USB drivers have been reported throughout the years. If your USB drive is not detected by uLaunchELF (
mass:is empty) please try another one, preferably USB 2.0.
- Please note that some incompatibilities between certain USB drives and PS2 USB drivers have been reported throughout the years. If your USB drive is not detected by uLaunchELF (
Insert your USB flash drive into your PS2.
In uLaunchELF, navigate to the device named
mass:and open it.Locate and run
biosdrain.elf.You will know that it is finished when biosdrain says
Finished Everything. Please be patient, as USB on the PS2 is SLOW!Once the final message appears, you can now plug the USB drive back into your computer. You will know that the dump was successful if you see files ending in
.rom0,.rom1,.nvm, etc, prefixed by your console model ID in your USB drive.
PS2client / XLINK & PS2link
- When using XLINK, simply execute the
biosdrain.elfwith the user interface. - When using PS2client, cd into the directory where you have
biosdrain.elf, and simply runps2client execee host:biosdrain.elf - biosdrain will automatically detect that the
hostdevice is present and will dump your BIOS contents to the root directory ofhost(Usually where you have the biosdrain.elf file). - You will know that it is finished when biosdrain says
Finished Everything, either on screen or in your console log.
- When using XLINK, simply execute the
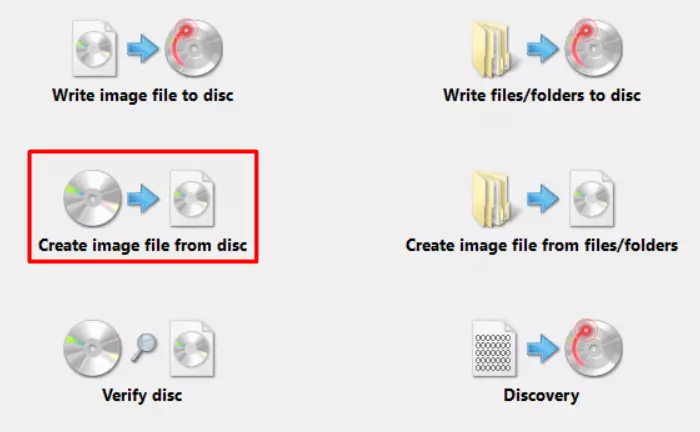
Dumping PS2 Discs via ImgBurn
PlayStation 2 game discs are unencrypted DVDs and CDs. This means they can be dumped quickly using a standard optical drive that supports DVD and CD optical media and the ImgBurn software. Dumping discs does not harm optical media directly.
Where to get ImgBurn
- Via Ninite (Recommended, safe and fast):
- Via ImgBurn themselves (Not recommended, comes with adware in the installer that must be manually unchecked during the install):
How it works
- Install and run ImgBurn
- Put your game disc into an optical drive
- Create an image file from a disc inside ImgBurn (highlighted in screenshot below)
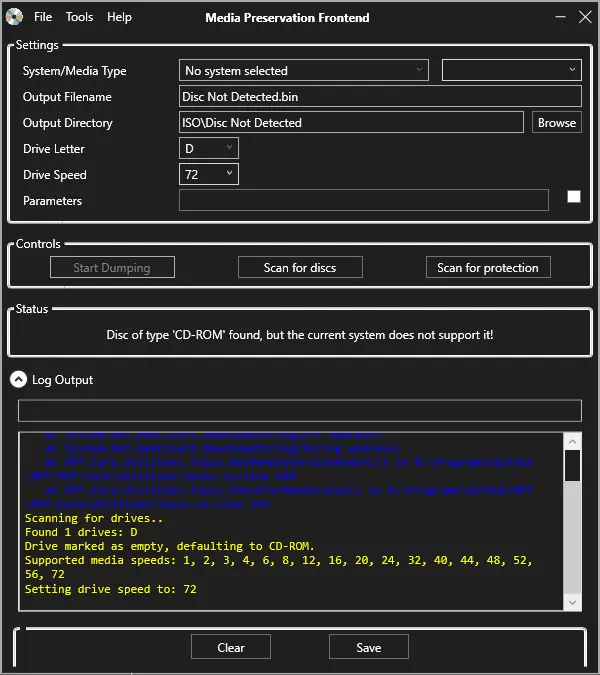
Alternative: Dumping PlayStation 2 discs with Media Preservation Frontend (more advanced)
This is a GUI for several applications aimed at preserving optical media. It can be a bit more involved for non-PlayStation disc dumping, but for PS1 and PS2 its fairly simple.
Where to get MPF
On GitHub: https://github.com/SabreTools/MPF
This tool is currently only available on Windows, but Linux support may be added in the future. It should be noted the command-line tools that are used for the backend of this tool are all free, open-source and available on all major operating systems.
How to use it
- Extract and run MPF
- Put your game disc into an optical drive
- Select PS2 for system/media type
- Select whether it is a CD-ROM PS2 game or DVD-ROM PS2 game
- Select output file name and directory
- Select the appropriate drive letter for the drive with the optical media in it
- Select "Start dumping"
One quick note, the lower the drive speed of the optical drive the more likely you are to get a good dump of the disc. The fastest drive speed will take much less time, but may be incomplete, corrupted, or inaccurate. It could also be perfectly fine, so depending on your drive and your media, try different things and see what works best for you.